
You either landed on this blog post because
- you are a huge fan of Hacktivity
- you bought this badge around a year ago
- you are just interested in hacker conference badge hacking.
or maybe all of the above. Whatever the reasons, this guide should be helpful for those who never had any real-life experience with these little gadgets.
But first things first, here is a list what you need for hacking the badge:
- a computer with USB port and macOS, Linux or Windows. You can use other OS as well, but this guide covers these
- USB mini cable to connect the badge to the computer
- the Hacktivity badge from 2018
By default, this is how your badge looks like.
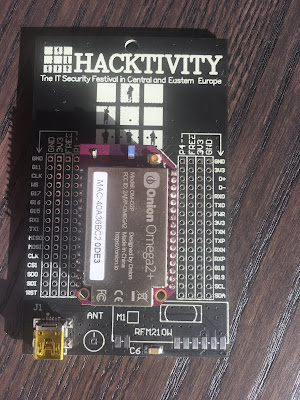
Let's get started
Luckily, you don't need any soldering skills for the first steps. Just connect the USB mini port to the bottom left connector on the badge, connect the other part of the USB cable to your computer, and within some seconds you will be able to see that the lights on your badge are blinking. So far so good.
Now, depending on which OS you use, you should choose your destiny here.
Linux
The best source of information about a new device being connected is
# dmesg
The tail of the output should look like
[267300.206966] usb 2-2.2: new full-speed USB device number 14 using uhci_hcd [267300.326484] usb 2-2.2: New USB device found, idVendor=0403, idProduct=6001 [267300.326486] usb 2-2.2: New USB device strings: Mfr=1, Product=2, SerialNumber=3 [267300.326487] usb 2-2.2: Product: FT232R USB UART [267300.326488] usb 2-2.2: Manufacturer: FTDI [267300.326489] usb 2-2.2: SerialNumber: AC01U4XN [267300.558684] usbcore: registered new interface driver usbserial_generic [267300.558692] usbserial: USB Serial support registered for generic [267300.639673] usbcore: registered new interface driver ftdi_sio [267300.639684] usbserial: USB Serial support registered for FTDI USB Serial Device [267300.639713] ftdi_sio 2-2.2:1.0: FTDI USB Serial Device converter detected [267300.639741] usb 2-2.2: Detected FT232RL [267300.643235] usb 2-2.2: FTDI USB Serial Device converter now attached to ttyUSB0
Dmesg is pretty kind to us, as it even notifies us that the device is now attached to ttyUSB0.
From now on, connecting to the device is exactly the same as it is in the macOS section, so please find the "Linux users, read it from here" section below.
macOS
There are multiple commands you can type into Terminal to get an idea about what you are looking at. One command is:
# ioreg -p IOUSB -w0 -l
With this command, you should get output similar to this:
+-o FT232R USB UART@14100000 <class AppleUSBDevice, id 0x100005465, registered, matched, active, busy 0 (712 ms), retain 20> | { | "sessionID" = 71217335583342 | "iManufacturer" = 1 | "bNumConfigurations" = 1 | "idProduct" = 24577 | "bcdDevice" = 1536 | "Bus Power Available" = 250 | "USB Address" = 2 | "bMaxPacketSize0" = 8 | "iProduct" = 2 | "iSerialNumber" = 3 | "bDeviceClass" = 0 | "Built-In" = No | "locationID" = 336592896 | "bDeviceSubClass" = 0 | "bcdUSB" = 512 | "USB Product Name" = "FT232R USB UART" | "PortNum" = 1 | "non-removable" = "no" | "IOCFPlugInTypes" = {"9dc7b780-9ec0-11d4-a54f-000a27052861"="IOUSBFamily.kext/Contents/PlugIns/IOUSBLib.bundle"} | "bDeviceProtocol" = 0 | "IOUserClientClass" = "IOUSBDeviceUserClientV2" | "IOPowerManagement" = {"DevicePowerState"=0,"CurrentPowerState"=3,"CapabilityFlags"=65536,"MaxPowerState"=4,"DriverPowerState"=3} | "kUSBCurrentConfiguration" = 1 | "Device Speed" = 1 | "USB Vendor Name" = "FTDI" | "idVendor" = 1027 | "IOGeneralInterest" = "IOCommand is not serializable" | "USB Serial Number" = "AC01U4XN" | "IOClassNameOverride" = "IOUSBDevice" | } The most important information you get is the USB serial number - AC01U4XN in my case.
Another way to get this information is
Another way to get this information is
# system_profiler SPUSBDataTypewhich will give back something similar to:
FT232R USB UART: Product ID: 0x6001 Vendor ID: 0x0403 (Future Technology Devices International Limited) Version: 6.00 Serial Number: AC01U4XN Speed: Up to 12 Mb/sec Manufacturer: FTDI Location ID: 0x14100000 / 2 Current Available (mA): 500 Current Required (mA): 90 Extra Operating Current (mA): 0
The serial number you got is the same.
What you are trying to achieve here is to connect to the device, but in order to connect to it, you have to know where the device in the /dev folder is mapped to. A quick and dirty solution is to list all devices under /dev when the device is disconnected, once when it is connected, and diff the outputs. For example, the following should do the job:
The result should be obvious, /dev/tty.usbserial-AC01U4XN is the new device in case macOS. In the case of Linux, it was /dev/ttyUSB0.
Regarding the async config parameters, the default is that 8 bits are used, there is no parity bit, and 1 stop bit is used. The short abbreviation for this is 8n1. In the next example, you will use the screen command. By default, it uses 8n1, but it is called cs8 to confuse the beginners.
If you type:
# screen /dev/tty.usbserial-AC01U4XN 9600
or
# screen /dev/ttyUSB0 9600
and wait for minutes and nothing happens, it is because the badge already tried to communicate via the USB port, but no-one was listening there. Disconnect the badge from the computer, connect again, and type the screen command above to connect. If you are quick enough you can see that the amber LED will stop blinking and your screen command is greeted with some interesting information. By quick enough I mean ˜90 seconds, as it takes the device 1.5 minutes to boot the OS and the CTF app.


You might check the end of the macOS section in case you can't see anything. Timing is everything.
What you are trying to achieve here is to connect to the device, but in order to connect to it, you have to know where the device in the /dev folder is mapped to. A quick and dirty solution is to list all devices under /dev when the device is disconnected, once when it is connected, and diff the outputs. For example, the following should do the job:
ls -lha /dev/tty* > plugged.txt ls -lha /dev/tty* > np.txt vimdiff plugged.txt np.txt
The result should be obvious, /dev/tty.usbserial-AC01U4XN is the new device in case macOS. In the case of Linux, it was /dev/ttyUSB0.
Linux users, read it from here. macOS users, please continue reading
Now you can use either the built-in screen command or minicom to get data out from the badge. Usually, you need three information in order to communicate with a badge. Path on /dev (you already got that), speed in baud, and the async config parameters. Either you can guess the speed or you can Google that for the specific device. Standard baud rates include 110, 300, 600, 1200, 2400, 4800, 9600, 14400, 19200, 38400, 57600, 115200, 128000 and 256000 bits per second. I usually found 1200, 9600 and 115200 a common choice, but that is just me.Regarding the async config parameters, the default is that 8 bits are used, there is no parity bit, and 1 stop bit is used. The short abbreviation for this is 8n1. In the next example, you will use the screen command. By default, it uses 8n1, but it is called cs8 to confuse the beginners.
If you type:
# screen /dev/tty.usbserial-AC01U4XN 9600
or
# screen /dev/ttyUSB0 9600
and wait for minutes and nothing happens, it is because the badge already tried to communicate via the USB port, but no-one was listening there. Disconnect the badge from the computer, connect again, and type the screen command above to connect. If you are quick enough you can see that the amber LED will stop blinking and your screen command is greeted with some interesting information. By quick enough I mean ˜90 seconds, as it takes the device 1.5 minutes to boot the OS and the CTF app.
Windows
When you connect the device to Windows, you will be greeted with a pop-up.

Just click on the popup and you will see the COM port number the device is connected to:

In this case, it is connected to COM3. So let's fire up our favorite putty.exe, select Serial, choose COM3, add speed 9600, and you are ready to go!

You might check the end of the macOS section in case you can't see anything. Timing is everything.
The CTF
Welcome to the Hacktivity 2018 badge challenge! This challenge consists of several tasks with one or more levels of difficulty. They are all connected in some way or another to HW RE and there's no competition, the whole purpose is to learn things. Note: we recommend turning on local echo in your terminal! Also, feel free to ask for hints at the Hackcenter! Choose your destiny below: 1. Visual HW debugging 2. Reverse engineering 3. RF hacking 4. Crypto protection Enter the number of the challenge you're interested in and press [
Excellent, now you are ready to hack this! In case you are lost in controlling the screen command, go to https://linuxize.com/post/how-to-use-linux-screen/.
I will not spoil any fun in giving out the challenge solutions here. It is still your task to find solutions for these.
But here is a catch. You can get a root shell on the device. And it is pretty straightforward. Just carefully remove the Omega shield from the badge. Now you see two jumpers; by default, these are connected together as UART1. As seen below.
I will not spoil any fun in giving out the challenge solutions here. It is still your task to find solutions for these.
But here is a catch. You can get a root shell on the device. And it is pretty straightforward. Just carefully remove the Omega shield from the badge. Now you see two jumpers; by default, these are connected together as UART1. As seen below.

But what happens if you move these jumpers to UART0? Guess what, you can get a root shell! This is what I call privilege escalation on the HW level :) But first, let's connect the Omega shield back. Also, for added fun, this new interface speaks on 115200 baud, so you should change your screen parameters to 115200. Also, the new interface has a different ID under /dev, but I am sure you can figure this out from now on.

If you connect to the device during boot time, you can see a lot of exciting debug information about the device. And after it boots, you just get a root prompt. Woohoo!
But what can you do with this root access? Well, for starters, how about running
# strings hello | less
From now on, you are on your own to hack this badge. Happy hacking.
Big thanks to Attila Marosi-Bauer and Hackerspace Budapest for developing this badge and the contests.
PS: In case you want to use the radio functionality of the badge, see below how you should solder the parts to it. By default, you can process slow speed radio frequency signals on GPIO19. But for higher transfer speeds, you should wire the RF module DATA OUT pin with the RX1 free together.

Continue reading
- Hacking Tools Usb
- Hacking Tools And Software
- What Are Hacking Tools
- Hacker Tools Linux
- Best Hacking Tools 2019
- Nsa Hacker Tools
- Hacker Tools Software
- Pentest Tools Subdomain
- Hacking Tools Windows
- Physical Pentest Tools
- Hack Tools Mac
- Hacker Tools Online
- Hacker Security Tools
- Github Hacking Tools
- Easy Hack Tools
- Hackers Toolbox
- Hacker
- Hacker Tools Windows
- Hack Website Online Tool
- Hackers Toolbox
- Hacker Security Tools
- Hacking Tools For Windows 7
- Hacker Tools Apk
- Pentest Tools
- Hacker Search Tools
- Pentest Recon Tools
- Hacking Apps
- Android Hack Tools Github
- Hack Website Online Tool
- Hacker Tools Apk
- Best Pentesting Tools 2018
- Blackhat Hacker Tools
- Hacking Tools 2020
- Best Hacking Tools 2019
- Hacker Tools 2020
- Hack And Tools
- Hack Tools Download
- Hacking Tools For Beginners
- Hack Website Online Tool
- Hacker Tools For Windows
- Pentest Tools Port Scanner
- Pentest Tools Url Fuzzer
- Hack App
- Hack Tool Apk
- Hack Apps
- Hacking Tools Online
- Hack Website Online Tool
- Ethical Hacker Tools
- Tools 4 Hack
- How To Install Pentest Tools In Ubuntu
- Hacking Tools For Windows
- How To Hack
- Pentest Tools Framework
- Hacking Tools For Kali Linux
- Hacking Tools 2020
- Pentest Tools Nmap
- Hacker Tools Mac
- Growth Hacker Tools
- Hacker Tools For Ios
- Hacking Tools Hardware
- Pentest Tools Download
- Pentest Tools List
- Hacking Tools Pc
- Hack Tools Online
- Hacker Tools For Pc
- Pentest Tools Website Vulnerability
- Hacker Tools 2020
- Hack Tools Mac
- Hacker Tools For Windows
- Hack Tools For Pc
- Github Hacking Tools
- World No 1 Hacker Software
- Pentest Box Tools Download
- Hacker Tools Windows
- Hack Tools Github
- Pentest Tools
- Pentest Recon Tools
- Tools 4 Hack
- Hacker Tools For Ios
- Pentest Tools Online
- Hack Website Online Tool
- Hack Website Online Tool
- Hacking App
- Hacking Tools Windows


